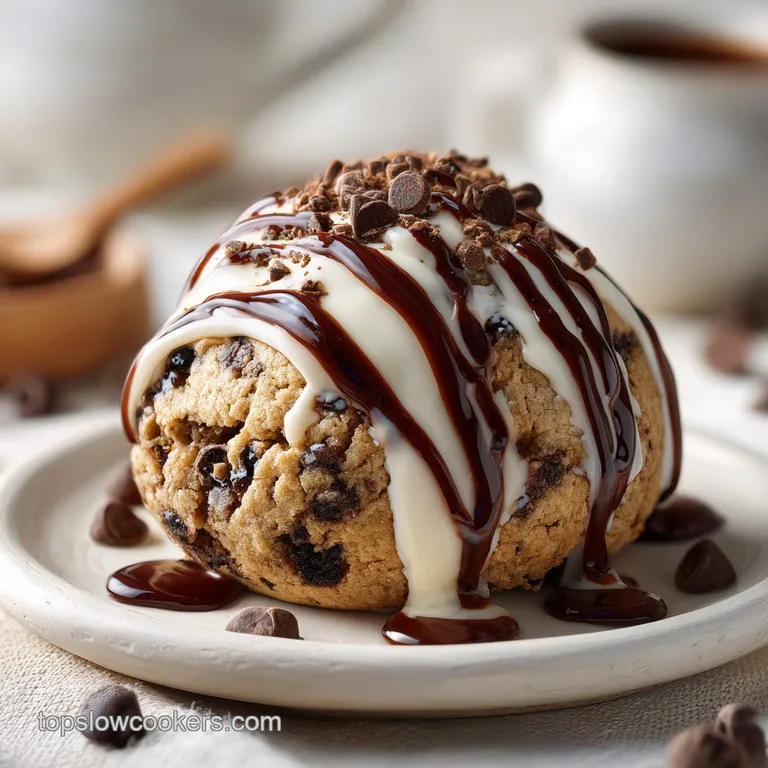
Chocolate Chip Cookie Dough Brownie Bomb
- Time: Active 40 minutes, Passive 25 minutes, Total 65 minutes
- Flavor/Texture Hook: Fudgy, silky, and snappy
- Perfect for: Weekend parties, gift boxes, or a decadent weeknight treat
- The Ultimate Chocolate Chip Cookie Dough Brownie Bomb
- What to Expect From This Treat
- Secrets to a Silky Texture
- Your Total Recipe Success Timeline
- Essential Elements for Success
- Ingredients and Substitutes
- The Tools You'll Actually Use
- Step by Step Construction Guide
- Solving Common Texture Problems
- Adjusting for Larger Crowds
- Budget Alternatives Table
- Debunking Dessert Myths
- Storing and Using Scraps
- Perfect Ways to Serve
- Recipe FAQs
- 📝 Recipe Card
The Ultimate Chocolate Chip Cookie Dough Brownie Bomb
Have you ever found yourself standing in front of the fridge at 9 PM, spoon in hand, debating if raw cookie dough is worth the risk? We've all been there. There's something about that gritty, sugary, buttery texture that a baked cookie just can't replicate.
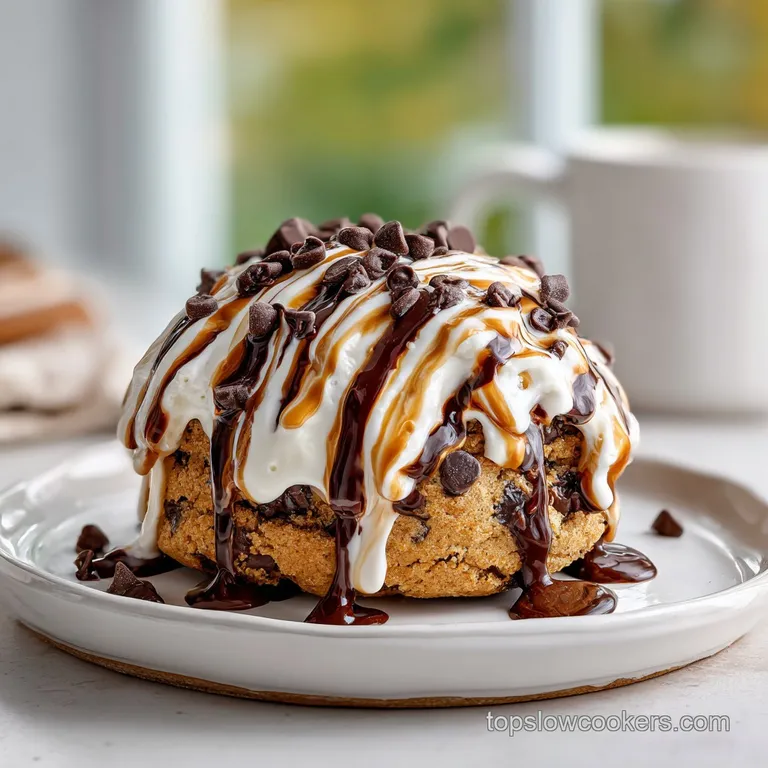
But what if you could have that exact sensation, safely, tucked inside a rich brownie and dunked in dark chocolate? That's where this Brownie Bomb with Chocolate Drizzle comes in. It's the ultimate "everything" dessert that satisfies every single craving at once.
Get ready to experience pure bliss with this incredible Chocolate Chip Cookie Dough Brownie Bomb with Chocolate Drizzle. This isn't just another sugary snack, it's a project that results in a professional grade truffle right in your own kitchen.
I remember the first time I tried to make these without heat treating the flour. I was so worried about the "raw" aspect that I almost talked myself out of it. Once I realized how easy it was to make the dough safe, it changed my entire approach to "no bake" treats.
You don't need a pastry degree to pull this off. It's mostly about assembly and patience. We're using a fudgy brownie mix as a shortcut because, let's be honest, on a Tuesday night, no one has time to melt individual blocks of chocolate for the base layer.
By focusing our energy on the cookie dough center and the chocolate coating, we get a high end result without spending five hours in the kitchen. It's the perfect way to impress friends at a potluck or just treat yourself after a long week.
What to Expect From This Treat
When you bite into this Brownie Bomb, the first thing you'll notice is the "snap." That comes from the dark chocolate wafers mixed with a tiny bit of coconut oil. It shatters between your teeth, giving way to the soft, pliable brownie layer. But the real star is the center.
It's a dense, velvety cookie dough that feels exactly like the stuff from the tube, but with a much cleaner, more buttery flavor profile.
The sea salt in the dough is crucial here. It cuts right through the sugar, making sure the whole thing isn't cloyingly sweet. You get the crunch of the mini chips, the chew of the brownie, and the silkiness of the dough all in one mouthful.
It’s a texture journey that keeps you coming back for "just one more." Because we use vanilla bean paste instead of just extract, you’ll even see those little black specks of vanilla, which makes the whole thing feel much more expensive than it actually is.
This recipe makes 20 servings, which sounds like a lot, but they disappear fast. They're heavy, dense, and satisfying. One bomb is usually enough to curb a serious chocolate craving. If you're a fan of rich desserts, you might find this reminds you of a Moist Homemade Vanilla Cake but concentrated into a single, fudgy bite. It's a "zero fuss" way to get a gourmet result using pantry staples like flour, sugar, and oil.
Secrets to a Silky Texture
The texture of the Brownie Bomb with Chocolate Drizzle depends entirely on how you handle the moisture levels in each layer. If the brownie is too dry, it will crack when you try to wrap it. If the cookie dough is too warm, it will turn into a puddle when you dip it.
We use a few specific tricks to make sure everything stays exactly where it should.
- Heat Treated Stability: Toasting the flour doesn't just kill bacteria; it removes moisture, allowing the dough to hold its shape without becoming gummy.
- Fat to Sugar Ratio: Using 115g of unsalted butter against 150g of total sugar creates a paste that stays soft even when refrigerated, preventing a rock hard center.
- Brownie Pliability: Adding cold water to crumbled brownies creates a "cake pop" consistency, allowing the outer layer to stretch around the dough ball without snapping.
- Coconut Oil Snap: Adding 1 tbsp of coconut oil to the melting wafers lowers the melting point slightly but increases the shine and creates a cleaner break when bitten.
| Texture Target | Temperature | Prep Action | Visual Cue |
|---|---|---|---|
| Silky Center | Room Temp (68°F) | Cream butter 3 mins | Pale and fluffy |
| Pliable Wrap | Cool (60°F) | Add 0.25 cup water | Feels like clay |
| Snappy Shell | Cold (40°F) | Chill 15 mins | Matte finish |
One of the most important things to remember is the cooling time. You cannot rush the brownie layer. If the brownie mix is even slightly warm when you crumble it, the moisture will evaporate too quickly, and you'll end up with a gritty mess.
Let it sit on the counter until it's completely at room temperature before you even think about starting the assembly.
Your Total Recipe Success Timeline
Planning your workflow is the secret to a stress free kitchen. Since this recipe takes 65 minutes total, you want to make sure you're using those 40 minutes of prep time efficiently while the brownies bake.
It’s all about the "overlap." While the oven is preheating to 350°F, you can weigh out your flour and sugars.
Phase one is the heat treatment and baking. You'll spend about 8 minutes toasting the flour and another 25 minutes waiting for the brownie mix to cook. This is your "down time." Use it to cream your butter and sugars.
By the time the brownies are cooling, your cookie dough should already be rolled into balls and sitting in the freezer for their 15 minute firm up.
The final 20 minutes is the assembly line. Wrapping 20 dough balls in brownie clay takes a bit of focus, but it’s actually quite meditative. Once they’re wrapped, the dipping process goes by in a flash.
If you have a partner or a kid who wants to help, the dipping and drizzling stage is the perfect time to get them involved. Just make sure they don't eat all the mini chocolate chips before they make it into the dough!
Essential Elements for Success
Using high-quality ingredients makes a massive difference when you aren't baking the final product. Since the cookie dough is eaten "raw" (after heat treating the flour), the flavor of the butter and vanilla is front and center.
I always reach for unsalted butter so I can control the salt level myself with that 0.5 tsp of sea salt. It ensures the flavor stays balanced and not overly savory.
The choice of chocolate for the coating is also a big deal. 340g of dark chocolate melting wafers are much easier to work with than chopped chocolate bars. Wafers are tempered to melt smoothly and set hard without that white "bloom" that sometimes happens with regular chocolate. If you want to experiment with other flavors, check out how different chocolates react in this Slow Cooker Lava Cake for a better understanding of melting points.
| Component | Role in Recipe | Pro Secret |
|---|---|---|
| All Purpose Flour | Structural Base | Sift immediately after toasting to prevent lumps. |
| Vanilla Bean Paste | Flavor Depth | Provides visual "gourmet" specks and intense aroma. |
| Coconut Oil | Coating Fluidity | Makes the chocolate thin enough to coat evenly. |
| Brown Sugar | Moisture & Chew | Keep it packed tight for a fudgy dough texture. |
Don't skip the whole milk in the cookie dough. It might seem like a small amount (2 tbsp), but it acts as the binder that replaces the moisture usually provided by eggs. Without it, your Dough Brownie Bomb will feel dry and crumbly on the inside instead of smooth and melt in-your mouth.
Ingredients and Substitutes
To make 20 of these decadent treats, you'll need to gather a few specific items. Make sure your butter is truly softened not melted! If it's too soft, the dough won't hold the chips; if it's too cold, it won't cream with the sugar.
- 125g all purpose flour: Why this? Provides the classic cookie structure without being too heavy. (Sub: Heat treated gluten-free 1:1 blend)
- 115g unsalted butter, softened: Why this? For that rich, creamy mouthfeel in the dough center. (Sub: Vegan butter sticks)
- 100g light brown sugar, packed: Why this? Adds molasses notes and keeps the dough soft. (Sub: Dark brown sugar for deeper flavor)
- 50g granulated sugar: Why this? Provides sweetness and a slight traditional grit. (Sub: Caster sugar)
- 2 tbsp whole milk: Why this? Replaces eggs to bind the dough safely. (Sub: Oat milk or heavy cream)
- 1 tsp vanilla bean paste: Why this? For a punchy, professional vanilla flavor. (Sub: 2 tsp vanilla extract)
- 0.5 tsp sea salt: Why this? To balance the sugar and enhance the chocolate. (Sub: Table salt, but use 1/4 tsp)
- 90g mini semi sweet chocolate chips: Why this? Small chips ensure every bite has chocolate without being chunky. (Sub: Chopped dark chocolate)
- 500g fudgy brownie mix: Why this? The fastest way to get a dense, pliable outer shell. (Sub: Homemade fudgy brownies, baked 5 mins less than usual)
- 3 large eggs: Why this? Necessary for the brownie mix structure. (Sub: Applesauce, though the wrap will be more fragile)
- 0.5 cup vegetable oil: Why this? Keeps the brownie layer moist and flexible. (Sub: Melted coconut oil)
- 0.25 cup cold water: Why this? Added to the mix and later to the crumbs for pliability. (Sub: Cold coffee for a mocha twist)
- 340g dark chocolate melting wafers: Why this? Designed for a smooth, hard shell finish. (Sub: Semi sweet chocolate chips with 1 tsp extra oil)
- 1 tbsp coconut oil: Why this? Thins the chocolate for a perfect drizzle and snap. (Sub: Neutral vegetable oil)
The Tools You'll Actually Use
You don't need a kitchen full of gadgets, but a few specific tools will make your life a lot easier. A stand mixer is great for creaming the butter, but a hand mixer works just as well. The most important thing is having a good baking sheet for the flour and a reliable 8x8 pan for the brownies.
For the assembly, a small cookie scoop (about 1 tablespoon size) is a lifesaver. It ensures all 20 of your Brownie Bomb with Chocolate Drizzle portions are the exact same size. This isn't just for looks it ensures they all chill at the same rate and fit perfectly inside the brownie coating.
You'll also want a dipping fork or a regular dinner fork with thin tines to submerge the bombs in the chocolate without leaving huge marks.
Finally,, don't underestimate the power of parchment paper. You'll use it twice: once for the cookie dough balls while they freeze and once for the finished bombs to set. If you try to put these directly on a plate or a wire rack, they will stick, and you'll lose that beautiful chocolate bottom.
step-by-step Construction Guide
Phase 1: Foundation
- Spread the 125g all purpose flour on a baking sheet and bake at 350°F (175°C) for 5-8 minutes until it hits 160°F. Note: This kills any bacteria, making the dough safe to eat.
- Sift that flour immediately to remove any toasted clumps.
- Prepare the 500g brownie mix with 3 eggs, 0.5 cup oil, and the specified water, then bake in an 8x8 pan until just set. Note: Under baking slightly helps the brownies stay fudgy and pliable.
- Let the brownies cool completely in the pan before touching them.
Phase 2: Engineering the "Bombs"
- Cream the 115g softened butter with both 100g brown and 50g white sugars until fluffy.
- Beat in the 2 tbsp milk, 1 tsp vanilla bean paste, and 0.5 tsp sea salt.
- Slowly mix in the heat treated flour until a thick dough forms, then fold in 90g mini chips.
- Scoop into 1 inch balls and freeze on parchment for 15 minutes. Wait until they are firm to the touch.
- Crumble the cooled brownies into a bowl and mix with 1/4 cup cold water until it feels like modeling clay.
- Flatten a tablespoon of the brownie mixture, place a chilled dough ball in the center, and wrap it up. Roll between your palms until smooth.
Phase 3: The Professional Finish
- Melt the 340g chocolate wafers and 1 tbsp coconut oil in a double boiler until smooth and glossy.
- Submerge each bomb using a fork, tap off the excess, and slide back onto parchment paper. Do this quickly before the chocolate sets.
- Drizzle the remaining chocolate in a zig zag pattern over the tops.
- Sprinkle with flaky sea salt while the drizzle is still wet.
- Chill in the fridge for 10 minutes until the shell is hard and matte.
Solving Common Texture Problems
Working with multi layered desserts can be tricky. Sometimes the brownie layer just doesn't want to behave, or the chocolate coating ends up looking lumpy. Most of these issues come down to temperature and moisture.
If your kitchen is very warm, the cookie dough will soften too quickly, making it hard to wrap the brownie around it without everything becoming a sticky mess.
Why Your Brownie Shell Cracks
If your brownie wrap is snapping or falling apart as you roll it, it’s usually because the brownie was over baked or didn't have enough moisture added during the "crumbling" phase. Brownies baked until "cakey" have less internal fat and sugar to act as a glue.
To fix this, add a teaspoon of water at a time to your brownie crumbs and keep kneading. You want the texture of play dough. If it's still cracking, you can pop the brownie mixture in the microwave for 10 seconds to soften the fats, which makes it much more stretchy and forgiving.
| Problem | Root Cause | Solution |
|---|---|---|
| Lumpy Coating | Chocolate seized or too thick | Add 1 tsp coconut oil and stir over low heat. |
| Leaking Centers | Dough was too soft when dipped | Freeze dough balls for an extra 10 minutes. |
| Greasy Dough | Butter was melted, not softened | Chill the dough for 30 mins before scooping. |
Common Mistakes Checklist
- ✓ Always sift the flour after heat treating; toasted flour creates hard little pebbles otherwise.
- ✓ Don't skip the 15 minute freeze; firm dough is the only way to get a round shape.
- ✓ Use cold water for the brownie clay, as warm water can make the fats separate.
- ✓ Dip the bombs while they are cold, but not frozen, to prevent the chocolate from cracking.
- ✓ Tap the fork on the side of the bowl to remove excess chocolate for a thin, professional shell.
Adjusting for Larger Crowds
Scaling this recipe is fairly straightforward, but there are a few things to keep in mind if you're doubling or tripling the batch for a big event. If you want to make 40 bombs, you'll need two 8x8 pans of brownies.
Don't try to bake one giant double batch in a 9x13 pan unless you adjust the time, as the edges will get too crunchy to use for wrapping.
When scaling up the cookie dough, don't just double the salt and vanilla bean paste. Start with 1.5 times the amount and taste it. Spices and extracts can become overwhelming very quickly in large quantities. Also, work in batches when dipping.
If you try to dip 40 bombs at once, your melted chocolate will likely start to cool and thicken before you're halfway through.
For scaling down to just 10 bombs, it’s actually easier to make the full brownie batch and just freeze the leftovers. Half a box of brownie mix is hard to measure accurately.
You can use half the cookie dough ingredients by beating one egg, using half of it for the brownie mix (if the box allows), and halving the butter and sugar for the center.
| Servings | Brownie Mix | Butter | Dipping Chocolate | Pan Size |
|---|---|---|---|---|
| 10 Bombs | 250g (Half) | 58g | 170g | 8x8 (Thin) |
| 20 Bombs | 500g | 115g | 340g | 8x8 (Standard) |
| 40 Bombs | 1000g | 230g | 680g | Two 8x8 pans |
Budget Alternatives Table
If dark chocolate wafers or vanilla bean paste aren't in the budget this week, don't worry. You can still make a killer Chip Cookie Dough Brownie Bomb with Chocolate Drizzle with a few smart swaps.
| Premium Ingredient | Budget Alternative | Flavor Impact | Savings |
|---|---|---|---|
| Vanilla Bean Paste | Pure Vanilla Extract | No black specks, same great aroma. | $10-15 |
| Melting Wafers | Semi Sweet Chips + Oil | Slightly softer shell, still delicious. | $4-6 |
| Sea Salt Flakes | Pinch of Table Salt | Less "crunch" but same flavor balance. | $3 |
| Brownie Mix | Homemade Cocoa Brownies | More effort, but uses pantry staples. | $2-3 |
Debunking Dessert Myths
One common myth is that you can't eat raw flour. This is actually true but only if you don't heat treat it! The danger in raw dough isn't just the eggs; it's the bacteria that can live in uncooked grain. Toasting your flour to 160°F makes it 100% safe.
Don't let anyone tell you that "a little raw flour won't hurt"; it’s a simple 5 minute step that gives you total peace of mind.
Another myth is that you need a professional tempering machine to get shiny chocolate. While tempering is a real science, using melting wafers is the "cheat code." These wafers are pre tempered.
As long as you melt them slowly and don't get a single drop of water in the bowl (which causes "seizing"), they will set with a beautiful, professional sheen every single time.
Finally,, people often think that brownies need to be "cakey" to hold their shape. In reality, the fudgier the brownie, the better it works for this recipe. Fudgy brownies have more fat and less air, which makes them act like a flexible skin for the cookie dough.
If your brownies are too fluffy, they’ll just crumble into dust when you try to roll them.
Storing and Using Scraps
The Brownie Bomb with Chocolate Drizzle is remarkably hardy. You can keep them in an airtight container in the fridge for up to 7 days. In fact, many people (myself included) think they taste even better after 24 hours because the flavors have time to meld and the center gets even silkier.
If you need to store them longer, they freeze beautifully for up to 3 months. Just thaw them in the fridge for a few hours before serving so the chocolate shell doesn't sweat.
Don't you dare throw away the brownie scraps! If you have extra brownie "clay" or leftover cookie dough, you can roll them together into "marbled" truffles. These won't be as pretty as the layered bombs, but they are just as delicious.
You can also crumble any broken bombs over vanilla ice cream for the most decadent sundae of your life.
If you find yourself with extra melted chocolate, dip some pretzels or dried fruit into it. There is zero waste in this kitchen! If you’re looking for more ways to use up pantry staples like chocolate and milk, my Slow Cooker Hot Chocolate is a great way to use up any leftover mini chips or cocoa powder you might have lying around.
Perfect Ways to Serve
When it comes to serving these, I like to keep it simple. They are so rich that they don't need much accompaniment. A cold glass of milk is the classic choice, but a strong cup of black coffee or an espresso really helps cut through the sweetness of the Cookie Dough Brownie Bomb with Chocolate Drizzle.
If you're serving them at a party, place each bomb in a mini cupcake liner. It makes them look like they came from a high end chocolatier and keeps people's fingers clean.
If you want to go the extra mile, serve them on a wooden board with some fresh raspberries. The tartness of the fruit is a perfect foil for the heavy chocolate and dough. For a "better than a restaurant" dessert platter, you could even serve a single bomb alongside a small slice of Crock Pot Bread Pudding for a study in different dessert textures.
Whatever you do, don't serve them straight out of the freezer. Give them at least 10-15 minutes at room temperature so the brownie layer softens up. You want that contrast between the snappy shell and the yielding, fudgy interior to be at its peak.
Trust me, once your friends see that perfect cross section of dough, brownie, and chocolate, you’ll be the designated dessert maker for every event from here on out!

Recipe FAQs
Is it safe to eat the cookie dough filling without cooking it?
Yes, provided you heat treat the flour first. You must spread the all-purpose flour on a baking sheet and bake it at 350°F for 5-8 minutes until it reaches 160°F to eliminate potential pathogens before mixing.
How to ensure the brownie "clay" has the right consistency?
Add the cold water slowly to the crumbled brownies. Mix until the texture becomes pliable like modeling clay, being careful not to add too much liquid so the bombs maintain their structure.
Is it necessary to freeze the cookie dough balls before wrapping them?
Yes, this step is critical. Freezing the 1 inch dough balls for 15 minutes firms them up, which is the only way to successfully wrap the brownie clay around them while keeping a round shape.
Is it true I should use warm water to soften the brownie scraps?
No, this is a common misconception. Use only cold water, as warm water can cause the fats in the brownie mix to separate, ruining the smooth texture of your brownie clay.
How to get a professional, thin chocolate shell?
Tap your dipping fork against the side of the bowl after submerging the bomb. This technique removes the excess chocolate, leaving you with a perfectly thin coating rather than a thick, clumpy layer.
How to store these for the best flavor?
Place them in an airtight container in the refrigerator. They taste best after 24 hours as the flavors meld, and they will stay fresh for up to 7 days in the fridge.
Can I keep the finished bombs in the freezer for later?
Yes, they freeze perfectly for up to 3 months. When you are ready to eat them, simply thaw the bombs in the refrigerator for a few hours so the dark chocolate shell does not sweat.
Chocolate Chip Brownie Bombs

Ingredients:
Instructions:
Nutrition Facts:
| Calories | 382 calories |
|---|---|
| Protein | 3.8g |
| Fat | 21g |
| Carbs | 47g |
| Fiber | 2.2g |
| Sugar | 34g |
| Sodium | 148mg |
