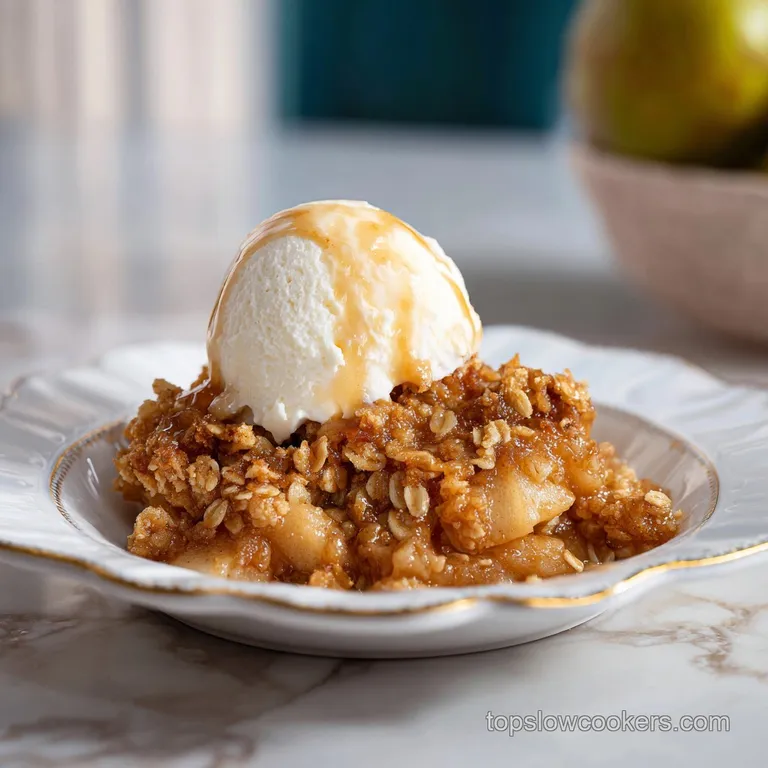
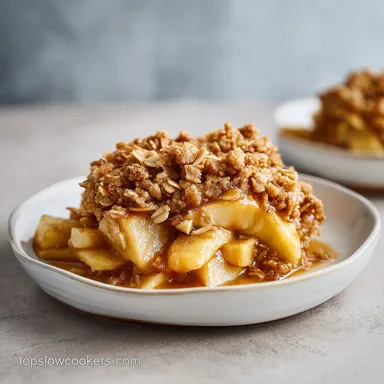
Crock Pot Apple Crisp: Silky Apples
- Time: Active 20 minutes, Passive 3 hours, Total 3 hours 20 mins
- Flavor/Texture Hook: Silky, cinnamon spiced apples topped with a buttery, toasted walnut shatter
- Perfect for: Lazy Sundays, holiday potlucks, or fuss free weeknight treats
- Why Slow Cooking Apples Works
- Essential Ingredients For Better Crisp
- Tools To Get Results
- Step By Step Cooking Guide
- Fixing Common Cooking Mistakes
- Customizing Your Sweet Treat
- Scaling This For Crowds
- Myths About Slow Cooker Baking
- Keeping Your Leftovers Fresh
- Perfect Ways To Serve
- Recipe FAQs
- 📝 Recipe Card
You know that specific Sunday afternoon feeling where you want something warm and comforting but the idea of hovering over a stove or timing a delicate cake feels like far too much work? I remember one rainy November when I had a pile of honeycrisp apples on the counter and absolutely zero energy.
I decided to see if my slow cooker could handle a classic crisp, and honestly, the result was a complete revelation. The way the spices soak into the fruit over a few hours creates a depth you just can't get with a quick 30 minute bake.
The smell is the first thing that hits you. About two hours in, your kitchen starts to smell like a cozy bakery, with notes of nutmeg and warm maple syrup swirling through the air. It's the kind of aroma that makes everyone wander into the kitchen asking, "Is it done yet?" But the real magic happens in the texture.
Instead of the apples turning into a flat mush, they hold their shape just enough to offer a soft bite, swimming in a thick, glossy sauce that's practically begging for a scoop of melting vanilla bean ice cream.
We've all had those desserts that look great but taste like a sugar bomb. This isn't that. By using maple syrup and coconut sugar, we get a rich, caramel like sweetness that feels balanced rather than cloying.
It's become my go to for weeknights when I want to feel like I've put in a ton of effort without actually doing much more than peeling a few pieces of fruit. Let's look at why this specific method works so well compared to the traditional oven bake.
Why Slow Cooking Apples Works
- over Low heat Osmosis: The gentle warmth draws out the apple juices slowly, allowing the maple syrup and spices to penetrate deep into the fruit fiber rather than just coating the outside.
- Starch Gelatinization: Using tapioca starch in a slow cooker environment allows it to hydrate fully, creating a velvety, clear sauce that doesn't taste "floury" or gritty.
- Pectin Retention: Maintaining a steady, lower temperature prevents the fruit's cell walls from completely collapsing, ensuring the wedges stay intact rather than turning into applesauce.
- Maillard Reaction Control: The edges of the crock pot get just hot enough to caramelize the sugars against the ceramic wall, providing those chewy, toffee like bites around the perimeter.
| Method | Total Time | Texture | Best For |
|---|---|---|---|
| Crock Pot | 3 hours 20 mins | Silky fruit, soft crunch top | Hands off prep, large groups |
| Traditional Oven | 1 hours | Crisp fruit, very crunchy top | Quick results, smaller batches |
| Stovetop | 45 minutes | Stewed fruit, crumbly top | Individual servings, control |
Choosing the right method depends on how much time you have. If you're busy with laundry or a movie marathon, the slow cooker is your best friend. It’s a similar "set it and forget it" vibe to making a Slow Cooker Butternut recipe, which also relies on that long, slow heat to develop flavor. While an oven gives you a harder "snap" on the topping, the slow cooker excels at that comforting, pudding like consistency that feels like a warm hug.
Essential Ingredients For Better Crisp
The soul of this dish lies in the contrast between the tender fruit and the nutty, textured topping. We aren't just tossing things in a pot; we're selecting components that stand up to three hours of steam and heat. This is where the physics of your ingredients really matters.
| Ingredient | Science Role | Pro Secret |
|---|---|---|
| Fresh Apples | Structure provider | Mix tart and sweet varieties to create a complex flavor profile. |
| Tapioca Starch | Thickening agent | It stays clear and glossy even after hours of cooking, unlike cornstarch. |
| Cold Butter | Fat pocket creator | Keeping it cold ensures the topping stays pebbly rather than melting into a flat sheet. |
| old-fashioned Oats | Moisture absorber | These have enough surface area to soak up excess steam without getting gummy. |
Right then, let's talk about the fruit. You'll need 2 lbs fresh apples (6-8 large), peeled, cored, and sliced into 1/2 inch wedges. If you slice them too thin, they'll vanish into the sauce. If they're too thick, they won't soften in time.
I usually go for a mix of Granny Smith for tartness and Honeycrisp for sweetness.
For the base, you'll also need 1/4 cup pure maple syrup, 1 tbsp ground cinnamon, 1/2 tsp ground nutmeg, 1 tsp pure vanilla extract, and 1 tbsp tapioca starch. This starch is the secret to avoiding a watery mess. It binds the juices into a luxurious glaze that clings to every slice.
The topping is where we build that "shatter" factor. You'll need 1 cup old-fashioned rolled oats, 1/2 cup almond flour, 1/2 cup coconut sugar, 1/2 cup chopped walnuts, and 1/2 tsp sea salt. To bring it all together, 6 tbsp cold unsalted butter, cubed, is essential.
Don't let the butter sit out on the counter while you prep the apples. Keep it in the fridge until the very last second.
| Original Ingredient | Substitute | Why It Works |
|---|---|---|
| Maple Syrup | Honey | Similar viscosity, though honey adds a floral note that changes the flavor profile. |
| Almond Flour | All Purpose Flour | AP flour is drier and will create a more traditional, "bready" crumble topping. |
| Coconut Sugar | Brown Sugar | Brown sugar has more moisture (molasses), leading to a slightly softer, chewier topping. |
| Walnuts | Pecans | Both have high fat content and provide a similar crunch. Note: Pecans are slightly sweeter. |
Tools To Get Results
You don't need a professional kitchen, but a few specific tools make this process a lot smoother. I highly recommend a 6 quart slow cooker. If your pot is too small, the apples will be stacked too deep and won't cook evenly. If it's too large, the sauce might burn before the fruit is tender.
A good vegetable peeler is also a lifesaver. I once tried to peel 2 lbs of apples with a dull paring knife, and my thumb didn't forgive me for a week. A sharp "Y" shaped peeler makes quick work of the skins. You'll also want a large mixing bowl for the apples and a medium one for the crumble.
A pastry cutter or even a couple of forks will help you work that cold butter into the oats without melting it with the heat from your hands.
Finally,, and this is the "blog trick" you really need: have a clean kitchen towel ready. We'll use this under the lid to catch condensation. Without it, the steam from the apples hits the cold lid, turns into water droplets, and rains back down on your topping, turning it into mush.
It’s a tiny detail that makes a massive difference in the final texture.
step-by-step Cooking Guide
- Prep the apples. Peel, core, and slice 2 lbs fresh apples into 1/2 inch thick wedges. Note: Consistent thickness ensures every bite is perfectly tender at the same time.
- Season the base. Toss the sliced apples with 1/4 cup pure maple syrup, 1 tbsp ground cinnamon, 1/2 tsp ground nutmeg, 1 tsp pure vanilla extract, and 1 tbsp tapioca starch until every wedge is evenly coated in a brown, spicy glaze.
- Fill the pot. Transfer the apple mixture into the bottom of your slow cooker, spreading them out into an even layer.
- Mix dry topping. In a separate bowl, combine 1 cup old-fashioned rolled oats, 1/2 cup almond flour, 1/2 cup coconut sugar, 1/2 cup chopped walnuts, and 1/2 tsp sea salt.
- Cut in the butter. Add 6 tbsp cold unsalted butter cubes to the oat mixture. Use a pastry cutter or your fingertips to rub the butter in until the mixture looks like coarse, pebbly sand.
- Layer the topping. Sprinkle the oat mixture evenly over the top of the apples. Do not stir it in; we want it to sit on top to stay as dry as possible.
- The towel trick. Place a clean, dry kitchen towel over the top of the slow cooker, then press the lid down over the towel. This captures the steam.
- Cook on low. Set your slow cooker to "Low" for 3 hours until the fruit juices are bubbling and the apples are tender when pierced with a fork.
- Venting (Optional). If you want a slightly crispier top, remove the lid for the last 30 minutes of cooking. This lets excess moisture escape.
- Rest and set. Turn off the heat and let the crisp sit for 15 minutes before serving. Note: This allows the tapioca starch to fully set the sauce.
Fixing Common Cooking Mistakes

Even the simplest recipes can go sideways if you aren't careful. The most common heartbreak with a Crock Pot Apple Crisp is the "soggy lid" syndrome. If you see water pooling on your topping, it's usually because the towel wasn't thick enough or the lid was removed too often, causing a temperature drop and more condensation.
Ending The Soggy Bottom Syndrome
If your apples are swimming in a soup rather than a glaze, you likely skipped the starch or used a very high moisture apple like a McIntosh. McIntosh apples are great for sauce, but they lose their structure almost instantly.
To fix this mid cook, you can whisk a teaspoon of extra starch into a tablespoon of cold water and stir it into the fruit layer (avoiding the topping) for the final 30 minutes.
Preventing Mushy Fruit
Texture is king. If your apples turned into a puree, you likely cooked them on "High" or left them in for 5+ hours. The slow cooker is efficient, but apples have a breaking point. Always stick to the "Low" setting for fruit desserts.
If you find yourself in a situation where the apples are done but the guests aren't ready, turn the pot to "Warm" and crack the lid slightly to stop the cooking process.
| Problem | Root Cause | Solution |
|---|---|---|
| Topping is gummy | Too much moisture/steam | Always use the towel trick under the lid to catch condensation. |
| Apples are crunchy | Slices were too thick | Ensure wedges are no more than 1/2 inch thick for even cooking. |
| Sauce is thin | Not enough thickener | Use 1 tbsp tapioca starch and let the dish rest 15 minutes after cooking. |
- ✓ Pat the apple slices dry if they seem excessively wet before mixing with spices.
- ✓ Keep the butter in the freezer for 10 minutes before cubing to ensure it stays cold.
- ✓ Don't peek! Every time you lift the lid, you lose 15 minutes of heat and create more steam.
- ✓ Use "Old Fashioned" oats, never "Quick" or "Instant" oats, which turn into paste.
- ✓ If using a smaller 3 quart pot, increase the cook time by 30 minutes as the layers will be deeper.
Customizing Your Sweet Treat
One of the things I love about this Crock Pot Apple Crisp is how easy it is to tweak based on what's in your pantry. If you are watching your budget, you can easily skip the walnuts and use extra oats, or swap the almond flour for regular all purpose flour.
It won't have that same nutty depth, but it will still be incredibly comforting.
For a holiday twist, I love throwing in a handful of fresh cranberries. They add a bright pop of color and a sharp tartness that cuts through the sweet maple syrup perfectly. It’s a great way to use up those leftover berries from making a Crock Pot Green recipe during a big Thanksgiving dinner. You can also experiment with the spices a pinch of ground ginger or even a tiny bit of cardamom can make this feel like a completely different dessert.
Achieving A gluten-free Delight
This recipe is naturally very close to being gluten-free, but you must ensure your oats are certified GF. Oats themselves don't contain gluten, but they are often processed in facilities with wheat.
The almond flour already provides a great gluten-free base for the crumble, giving it a rich, buttery texture that you sometimes lose with rice flour blends.
The "High Protein" Twist
If you want to feel a little better about eating this for breakfast (which I highly recommend), you can swap some of the almond flour for a neutral flavored protein powder. Just be careful not to use too much, or the topping can become dry.
Increasing the walnut count also adds healthy fats and protein, making the "shatter" of the topping even more substantial.
Scaling This For Crowds
If you're hosting a big family gathering, doubling this recipe is fairly straightforward, but you need to be mindful of the "depth" in the pot. When you stack 4 lbs of apples, the ones in the middle take much longer to reach the right temperature.
- To Scale Up (2x): Use a 7 quart or 8 quart slow cooker. Keep the spices at 1.5x rather than a full 2x to avoid overwhelming the fruit. You may need to extend the cook time by 45 minutes to 1 hour.
- To Scale Down (1/2): Use a 3 quart slow cooker. Reduce the cook time to 2 hours and 15 minutes. Watch the edges closely, as the smaller volume can burn faster against the ceramic walls.
Always remember that the topping to fruit ratio is a personal preference. If you're a "topping person," feel free to make a 1.5x batch of the crumble even if you're keeping the fruit amount the same. Just make sure the topping doesn't become so thick that the heat can't penetrate to the apples below. It's a balance, much like getting the creamy consistency right in a Crock Pot Potato recipe.
Myths About Slow Cooker Baking
There is a common misconception that you can't get a "crisp" top in a slow cooker. While it will never be as hard as a broiled topping, the towel trick and the 30 minute venting period at the end get it remarkably close.
People often think the steam makes everything a soggy mess, but that’s only true if you don’t provide a way for that moisture to be absorbed or escaped.
Another myth is that you must peel the apples. While I prefer them peeled for a "velvety" mouthfeel, the skins actually contain a lot of pectin which helps thicken the sauce.
If you're in a rush, leaving the skins on is perfectly fine, just be aware that they can become a bit papery after three hours of cooking. Personally, I like to save my peels to simmer on the stove with a cinnamon stick for a quick DIY home scent!
Keeping Your Leftovers Fresh
This dish keeps surprisingly well, though the topping will naturally soften as it sits in the fridge. To store, let the crisp cool completely to room temperature. This is vital if you put it in the fridge while warm, the trapped steam will turn your topping into a sponge.
Store it in an airtight container in the fridge for up to 4 days.
For freezing, you can actually freeze the cooked crisp! I like to portion it into individual containers. It will stay good for up to 3 months. To reheat, don't use the microwave if you can avoid it, as it makes the oats gummy.
Instead, pop a portion into a 350°F (180°C) oven or toaster oven for 10-15 minutes. This will revive the butter in the topping and give you back some of that toasted crunch.
Perfect Ways To Serve
While a bowl of this on its own is fantastic, the "A La Mode" style is the gold standard for a reason. The contrast of the hot, cinnamon spiced apples against the freezing, velvety vanilla ice cream is something I never get tired of.
If you want to get fancy, a drizzle of salted caramel or a dollop of bourbon infused whipped cream takes this from a "weeknight treat" to a "dinner party showstopper."
I also love serving the leftovers cold over Greek yogurt for breakfast. The oats and walnuts provide a nice texture, and the maple sweetened apples act like a natural fruit compote. It's zero fuss and feels much more decadent than a standard bowl of cereal.
Trust me, once you try this method, the oven version starts to feel like a lot of unnecessary hovering! Enjoy the process, let the slow cooker do the heavy lifting, and get ready for the best smelling house on the block.

Recipe FAQs
Can you make apple crisp in the slow cooker?
Yes, absolutely. The slow cooker provides gentle, even heat that softens the apples into a velvety filling while preserving their shape better than a high temperature oven bake.
What's the difference between an apple crumble and an apple crisp?
Crisp topping contains oats, crumble topping generally does not. The oats in a crisp help create a specific nutty texture that is less uniform than a pure flour and butter crumble mixture.
What is the secret to a good apple crisp?
Using tapioca starch and managing condensation. Tapioca starch creates a clear, glossy sauce, and you must use a dry towel under the slow cooker lid to absorb steam that would otherwise make the topping soggy.
Why won't my apple crisp topping get crispy in the slow cooker?
Moisture saturation is the primary cause. Ensure your butter is very cold when mixing the topping, and always use the towel under-lid trick to wick away excess condensation.
How should I slice apples for the slow cooker crisp?
Peel, core, and slice apples into uniform 1/2 inch wedges. Consistency is key so that all fruit softens evenly over the cooking time; thin slices will break down too much.
Can I substitute brown sugar for the maple syrup in the apple base?
Yes, but you change the flavor complexity. Brown sugar works, but maple syrup lends a deeper, more caramel like profile that complements the spices beautifully; it’s a similar flavor balancing act needed for our [Beef Stroganoff for recipe].
How long should I cook the crisp on Low versus High setting?
Cook on Low for 3 hours, or High for 90-120 minutes maximum. Stick to Low for desserts as the extended gentle heat prevents the fruit from turning into mush, which happens quickly on High.
Crock Pot Apple Crisp
Ingredients:
Instructions:
Nutrition Facts:
| Calories | 351 kcal |
|---|---|
| Protein | 4.9 g |
| Fat | 18.2 g |
| Carbs | 43.6 g |
| Fiber | 5.0 g |
| Sugar | 30.0 g |
| Sodium | 138 mg |
